easiest ways to Root Roses from Cuttings
Rooting Roses from Cuttings or Slips is an easy way to get more roses.
Rose propagation is simple enough for beginner gardeners and just plain fun for all.
You can easily root roses from cuttings or slips. This article will show you how to quickly and easily.
Some roses are harder to root than others so don’t be discouraged if you don’t have success, it could be the rose and not you.
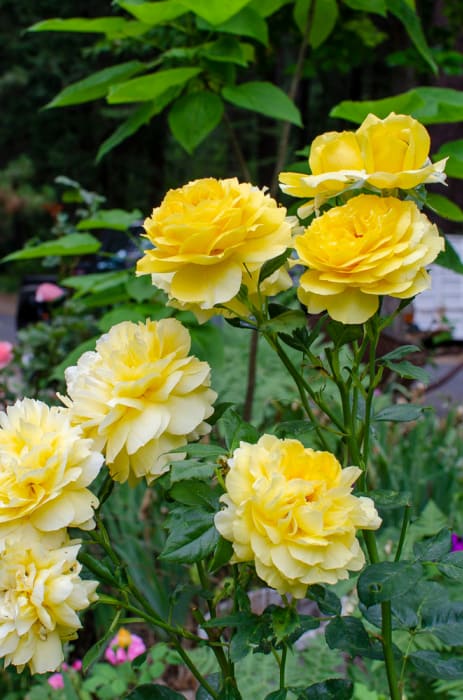
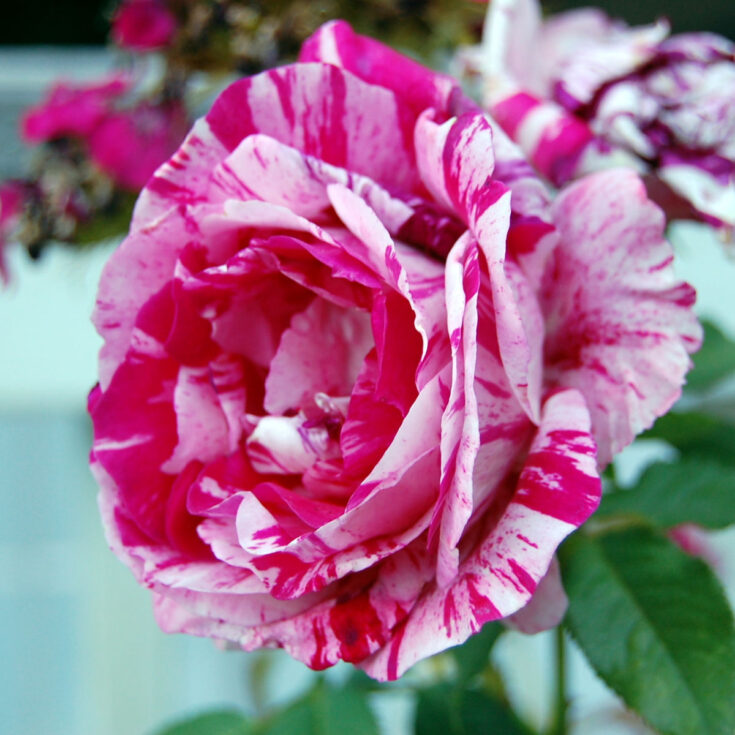
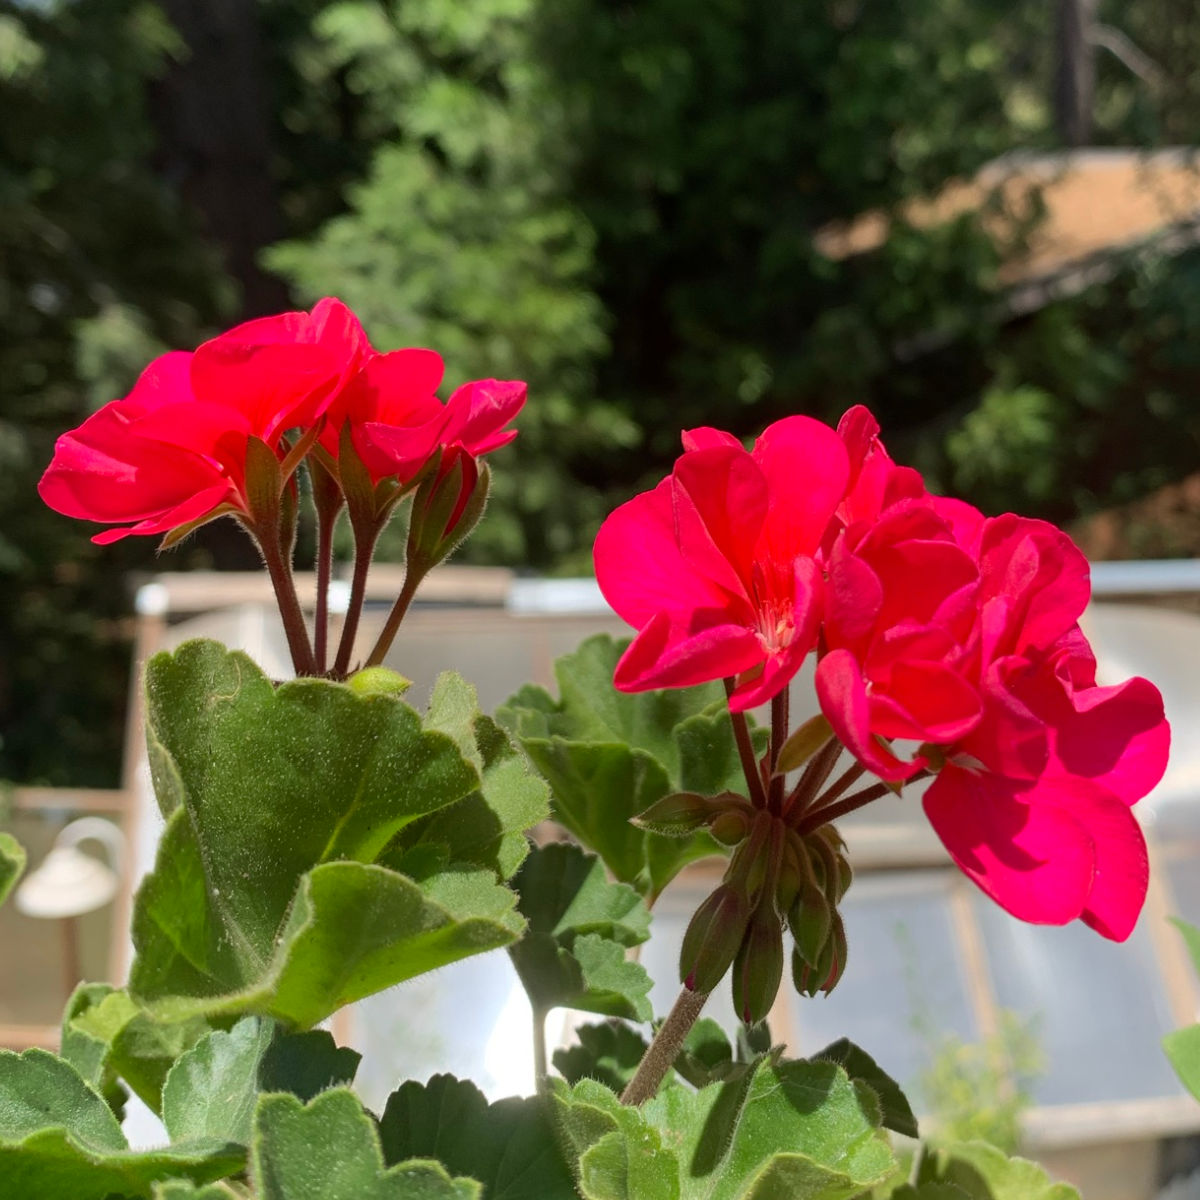
It is no secret I love roses. Almost any rose is top-notch in my book but I have a special affinity for old roses, English Roses, and their French counterpart, Romanticas.
Today we will find out:
- Why grow roses from cuttings
- How to take rose cuttings or slips
- How to Wound the rose stem
- Using Rooting Hormone to Speed things up
- Growing Medium to use to a Rose Cutting
- How to Maintain Humidity
- How Long to Root Rose Cuttings
- Planting your new Roses
This post contains affiliate links. If you make a purchase after clicking a link I may make a small commission at no added cost to you.
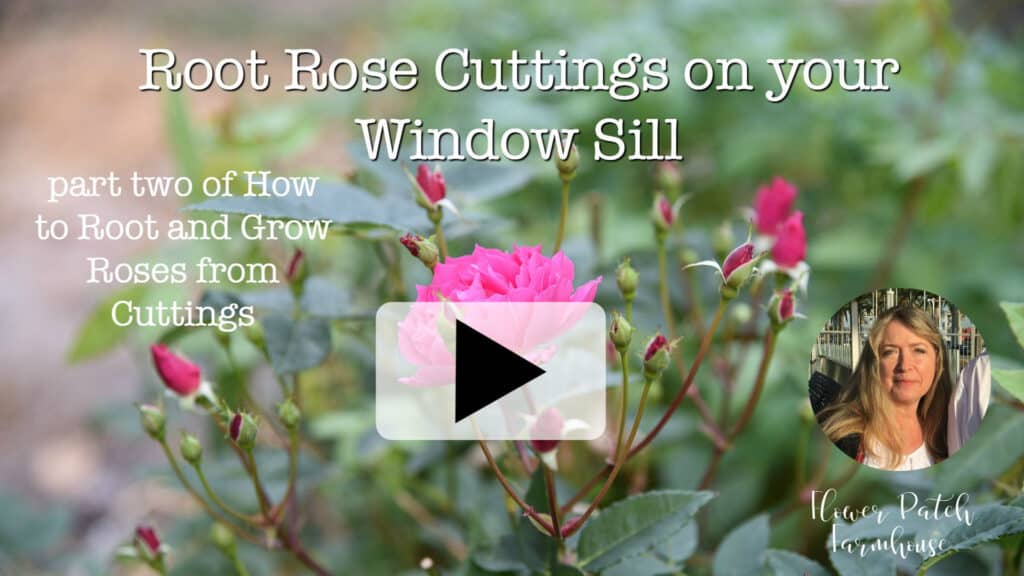
For my latest window sill propagation method see below where it says UPDATE
Important Note:
(when choosing roses to take cuttings from, please use only non-patented roses otherwise we are infringing on patents and that is considered stealing, there are tons of old roses that are not patented and they are easy-care, tough plants)
I have shared a post on Rooting Lilacs from cuttings and my setup for roses is similar as far as the fish tank and box of soil mix.
But if you don’t have that much room or you want a smaller setup? Voila, I have you covered.
Why Grow Rose Cuttings?
I love to grow roses cuttings not only because it is fun but it is also an easy way to get more of the roses that you love.
Plus it can save you if you lose your favorite roses for some reason or other.
In the article below I show you how I saved a rose that was dying from a rodent attack. But I could just have easily lost it forever.
Related: How I saved a Dying rose
Having spares that you have started from cuttings is a good insurance policy.
So here we go.
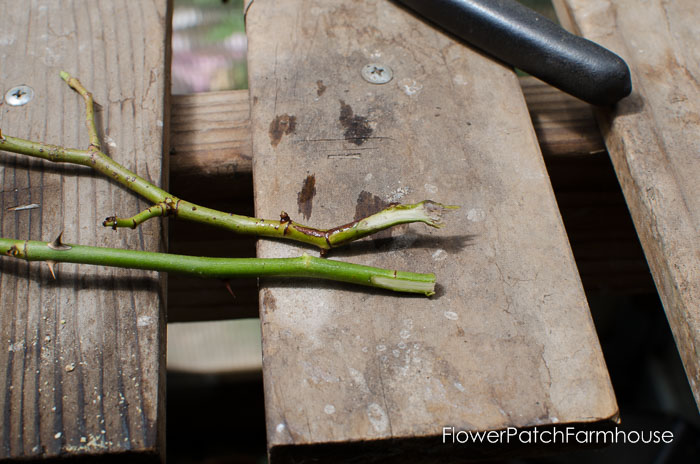
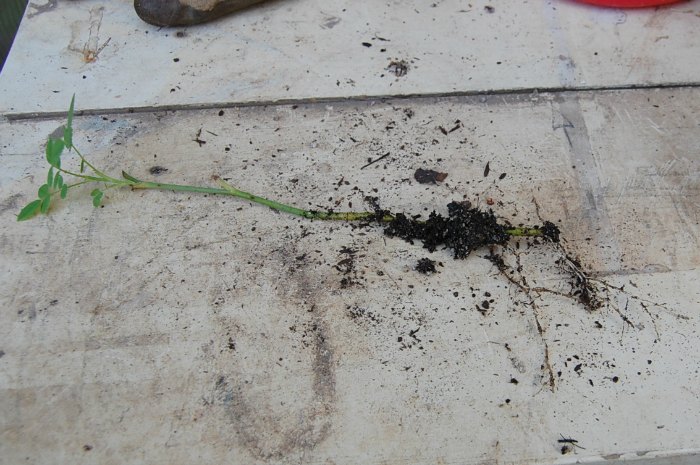
How to Take a Rose Cuttings or Slips
Take your rose cutting from a cane that has just finished blooming, you can see the spent blooms here. When cutting a rose you need sharp, clean tools.
My favorite tool for this is Fiskars Bypass Pruners
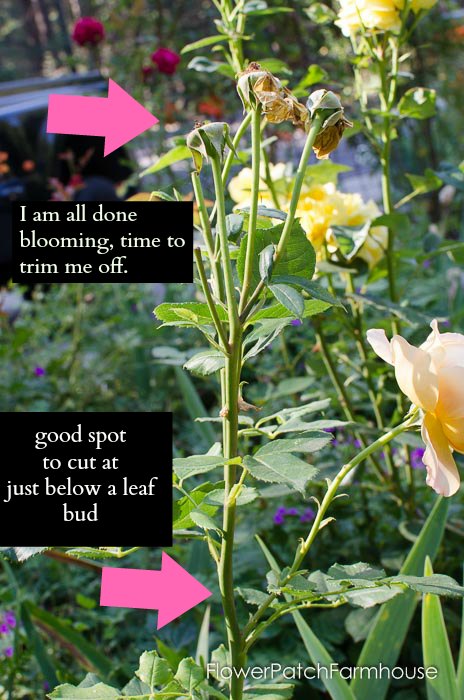
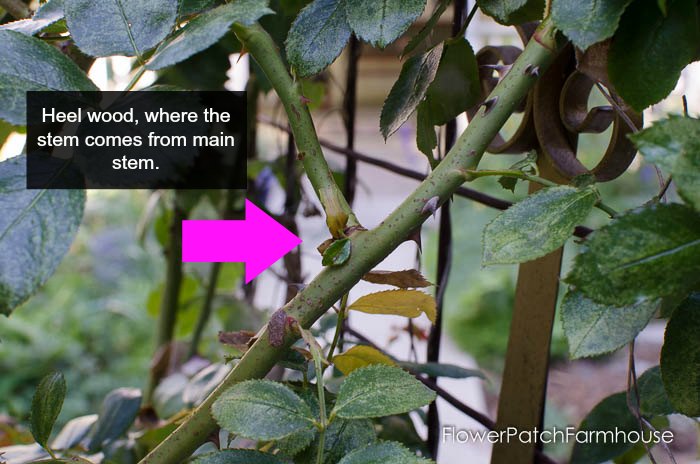
Some say getting the heel wood is the best but I cannot attest to that.
I should do some experiments and see if it works better than just a cane cut below a leaf bud.
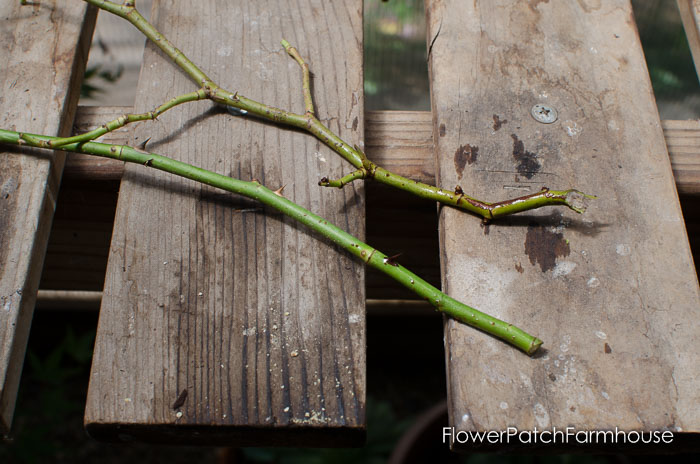
When cutting a rose cane take at least 6-inch length and you want the cane to be close to the diameter of a pencil, it can be a bit smaller around but that gives you an idea.
Wound the rose cuttings
This step is not absolutely necessary but it is claimed to encourage faster rooting.
To wound the heels of the cutting I scrape the end of the cutting with a very sharp knife or edge of my pruners to reveal the white layer, which will help in rooting.
I have also just stuck the canes as they are above straight into the rooting hormone and not wounded them and it has worked but wounding them supposedly produces more roots faster.
Wounding the cuttings exposes more of the Cambium layer and here is the definition of that right from a dictionary:
Definition of CAMBIUM. : a thin formative layer between the xylem and phloem of most vascular plants that gives rise to new cells and is responsible for secondary growth.
You can also wound the rose cutting by slicing a straight line with a razor, sharp knife, or xacto knife straight into the cane and not scrape away the green part.
Dip Rose Cuttings in Rooting Hormone
After you have wounded your rose cutting or slips, brush the wounded ends with a rooting hormone or solution. This speeds up the rooting process.
Right now I am loving this stuff for rooting, it roots things faster and more successfully. Hormex 8 Hormone Rooting Powder #8
It was recommended to me by a local Rose Society member who roots hundreds of roses each year.
However, I have used Olivia’s Cloning Gel and Garden Safe Take Root with success.
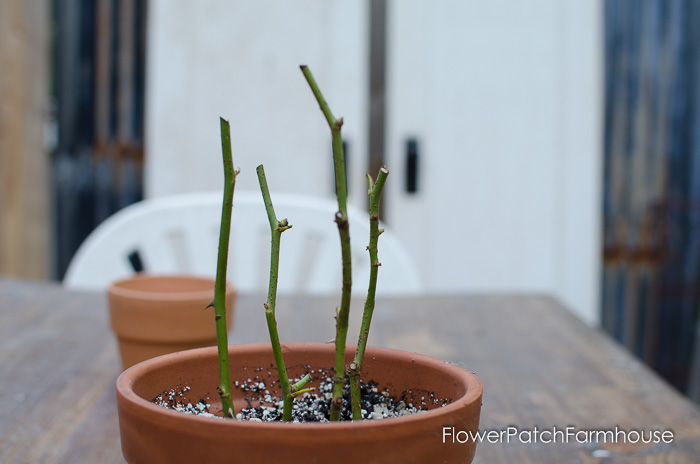
Growing Medium to Root Rose Cuttings
Mix up a growing medium of 1/3 perlite and 2/3 potting soil. Make sure the potting soil you use does not have fertilizer in it.
Put your soil in a pot that is wide enough for your cover to fit over but has a space around the rim. I have no issues with fungus or disease so I don’t worry about getting sterilized soil. You can pasteurize your soil mix if you feel it is needed.
My friend loves to use clean horticultural sand. She has successfully rooted cuttings and slips for over 50 years. Sand works great too.
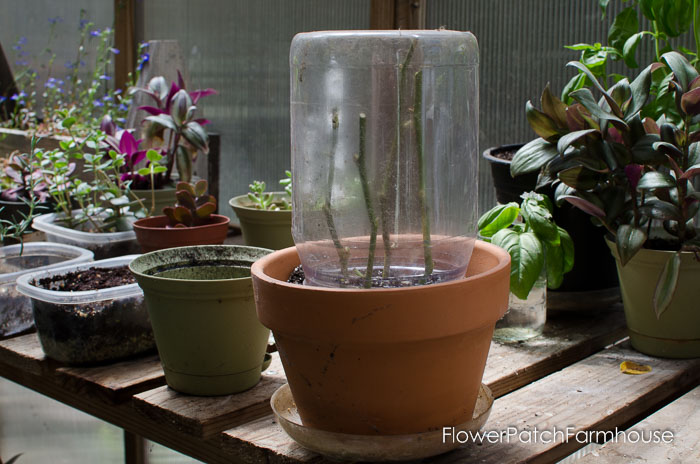
Put Rose Cuttings into a Terra Cotta Pot
(See below for a more updated variation I use also)
Right now I am using terracotta pots for rooting plants as I have found that because it breathes I have even more success than in plastic pots.
Related: Why I love terra cotta pots
Also by viewing the side of the pot I can tell if the soil is drying out, the clay shows if there is moisture present in the soil.
Put your canes down into the potting mix and water in well.
Cover to maintain humidity
Cover your rose cuttings or slips.
My cover is a large plastic mayonnaise jar from Mayo we get at Costco. I like the wider size as I can fit more cuttings in the pot at once.
Some like to use plastic bags or wrap but I have found that to be too fiddly. Others have used a 2-liter clear soda bottle but we don’t drink soda so this works for me.
How to Water Cuttings
The watering of your cuttings depends on so much, temperatures, the humidity of your region, and more.
You will need to determine by observation when to water your cuttings. You want to keep the medium moist but not saturated. How fast the soil dries out determines how often you water.
In the photo below, you can see the space between my cover and the pot.
This is where I will water when I need to. See the darker color of the pot when it is moist.
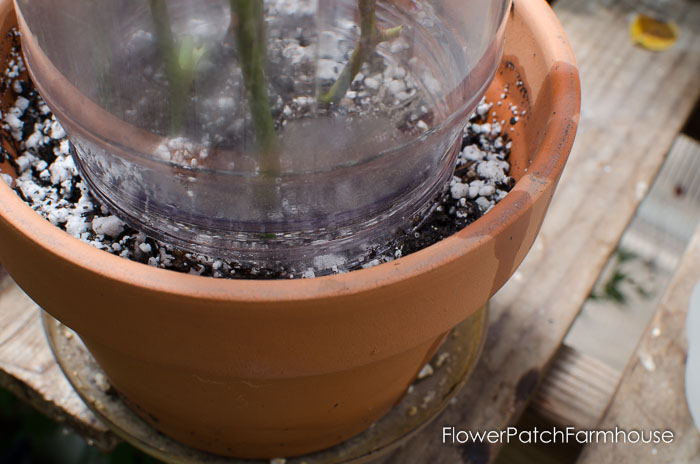
The base looks the same and when I see it drying out I know to water a bit. It is important to have a loose mix as you don’t want to drown the cuttings but you don’t want them to dry out either.
With the method of a jar on top just remove the jar and feel into the soil with your finger, poke down about 2 inches. You can also use a bamboo skewer. If the soil or medium is damp then do not water, if it is dry then add some water.
A great alternative is to use a moisture meter. This is the one I use.
You poke the pointed end down into the soil, where the roots should grow, and check if the soil is moist or wet. If it is measuring moist, don’t water; if it is edging close to dry then you can water a bit, but don’t let the pot sit in water.
Usually, if there is condensation in the jar then there is no need to water.
Place in a bright place where it does not get direct sun. Inside a greenhouse, in the shade of a tree on a covered porch. Direct sunlight will make it too hot for the cuttings and kill them off.
How long does it take for cuttings to root?
This varies just like the watering. Many people will give you a definite time frame of a few weeks but personally, I have found that it can depend on many things.
Again, time of year, temperatures, the rose type, and day length. Believe it or not, I have had rose cuttings root in 4 weeks and others that took a year.
Note: Roses root faster in temperatures between 70 and 80F.
I have even tried rooting one rose, called Tamalpais Homestead, several times and it never would root at all! That rose was a total rooting flop for many of us who root roses all the time. So I figure it will take Air Layering to get a new rose from it.
So be patient and diligent, and you should get roots in time.
Plant your Rooted Rose cuttings or slips
For a detailed step-by-step on Potting up Rooted rose cuttings see this post!
Don’t worry about the roots intertwining from all four canes.
I just pop all the cuttings and soil out of the pot (once I know there are good roots) and I put it in a tub of water, the soil washes away and the roots slide apart.
Re-pot each rooted rose cutting in its own pot and let it get big and strong.
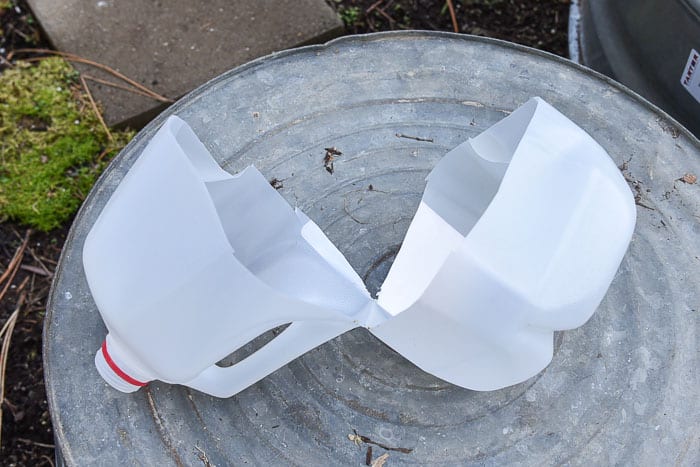
Another great container for this is the humble milk or water jug. I use these to winter sow seeds but they also work great for cuttings!
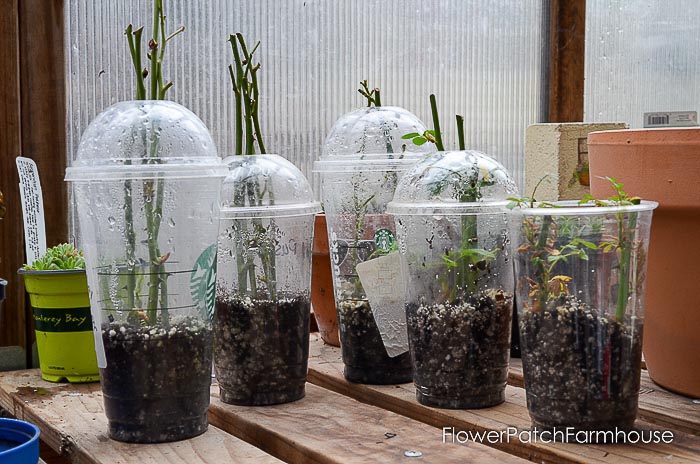
UPDATE:
This past Summer and Fall I tried another way to root roses..the essentials are the same but this container is so awesome and for the most part free!
My husband loves the frozen frappuccinos at coffee places and his empty cups are some of the best containers I have used so far to root roses.
They are so easy!
Just put some holes in the bottom (I use a metal skewer heated over a flame to melt holes into the bottom) of the clean cup.
Add your soil mix and poke the canes down into it.
I write the Rose name on the cup and lid so I know which ones are which.
See the video of how I do this here, just tap.
Let the top of the canes come through the hole in the lid. I did 4 to 5 canes per cup. Or you can just trim the cutting down to fit inside.
I like the taller cups better but it still works in the shorter ones.
The domed lids are perfect as the hole in the center allows air to get in but still keeps the moisture levels high enough and I have not had any issues with mildew.
Another bonus is it is easy to water through the top hole when needed.
I really do like being able to see when they have rooted!

I will let them get tons of roots before I separate them and pot them up into larger pots. For now, they are doing great just in the cups.
This works well because I can bring them in and put in on a bright windowsill. No direct sun though.
How long does it take roses to grow from cuttings?
When started in the summer roses can grow and bloom by the following summer! Yes, that quickly. They will be small but with proper care, they will fill out and grow into big beautiful plants!
Can’t plant your roses in the garden? You can grow roses in pots and containers. I show you how I do it here!
Can’t plant roses in your Garden?
Grow Roses in Pots, this is seriously easy!
Want to propagate your African Violets? This is so easy and is a fun way to get started with plant propagation!
Here is an easy DIY Arbor built from our Obelisk design!
Rooting Roses in Potatoes?
Just so you know I have tried the potato method that I have heard so much about and is popular on Pinterest or mentioned in some magazine articles, it just has not worked for me.
I have tried that method a few times and all I got were little potatoes and none of the cuttings rooted.
Zero, zip, nada!
At the same time, the cuttings I started using the other methods had an 80% success rate.
So save the potatoes for eating and just go this route for rooting roses, it is so much easier and more successful.
Hi, I’m Pamela
With 45 years of hands-on gardening experience, I love sharing practical tips, proven techniques, and inspiration drawn from my own gardens. My goal is to nurture your confidence, spark your passion, and help make every step of your gardening journey more enjoyable.


Root Roses from Cuttings
How to Root Roses from cuttings or slips. Easy step by step methods that are easy enough for the beginner and seasoned gardeners
Materials
- Rose cuttings
- sand
- potting soil
- containers, pots
- rooting hormone
Tools
- pruners or snips
Instructions
- Take 6-inch cuttings from the desired rose
- Keep moist until ready to pot
- Mix potting soil with horticultural sand to a ratio of 50/50
- Half fill clean sterilized pots and containers with a 50/50 mix of sand and potting soil
- Wound end of cuttings (optional)
- Dip cut end into rooting hormone
- Place cuttings into pots, you can place several in one pot
- Cover cuttings in pot with clear cup, mayonnaise jar or baggie to create a mini-greenhouse effect
- Place in a warm shady location and water as needed.
- DO NOT OVERWATER! Keep slightly moist not waterlogged.
- Wait until there is clear evidence of roots. In terra cotta pots the roots will begin to come through the drainage holes, in clear cups or milk jugs you should see roots on the bottom or along the sides.
Notes
when choosing roses to take cuttings from, please use only non-patented roses otherwise we are infringing on patents and that is considered stealing, there are tons of old roses that are not patented and they are easy-care, tough plants
Happy Gardening!
You May Also Enjoy…
Start Geraniums from Cuttings
Dahlias from Cuttings
Propagate Clematis by Layering
Propagate Perennials by Root Divisions

Loved this blog! Rooting roses from cuttings always felt difficult, but the way you’ve explained it makes it simple and doable. This is a great resource for home gardeners who want to propagate roses naturally.
Rooting roses from cuttings is a rewarding practice! It’s a budget-friendly way to expand your garden and preserve cherished blooms. Thanks for sharing these valuable insights!!!
wonderful information for flowers !
Hi, Awesome Flower information and Content are Wonderful. We get deep snow that protects them so I can leave mine out or in the greenhouse, which is unheated and does get very cold inside but it protects them enough. Thanks For Sharing.
Yes you can. And trimming it back will promote branching.
I started a rose from a cutting about two years ago.It is growing as just one tall stock. I want to cut it so it will branch. Can I do that and can I start a new rose from the very young cutting?
Thank you so much.
Teresa
You can propagate roses any time of year. If you take semi-hardwood cuttings this time of year it will just take longer to root them. I also place cuttings directly into the ground this time of year and a small trench that has sand placed in the bottom of it. I bury the cuttings and have a few inches sticking out of the ground. Come Spring I look for new growth.
Hi ,thanks for all the great tips ,,one question please, is it a good time to propagate roses in October? I live in south of Portugal,,,thanks a lot ,,,all the best
It is hard to say as there is so much more to it. But do the stems stay green? Or do they go brown too? The leaves curling and tips are not a big deal if the rest remains green. Many times I remove all the leaves completely. There can be a fungus present at the time of cutting so giving them a dip in some sanitizing solution like 1 part bleach to 9 parts water. Some use 3% hydrogen peroxide as an alternative. I have done neither so I cannot attest to it working but many swear by it.
Hi, I’ve been trying this method but the tips of my cuttings go brown and any leaves left on curl, any suggestions as to what I might be doing wrong
Thank you
They will go dormant in winter so keep them in an unheated garage or basement if you get super cold winters. Mine are just left outside as it can get down to the teens and 20’s but not below that usually.
How do I keep the rose cutting over winter. We get frost sometimes in October. Will they get splindly if kept in the house all winter? Our planting season starts around mid May. thank you
Once they enter dormancy (usually after the first hard frost or freeze and they lose their leaves) you can keep them in your unheated garage or other protected place. We get deep snow that protects them so I can leave mine out or in the greenhouse, which is unheated and does get very cold inside but it protects them enough.
What do you do with the cuttings in the winter? I live in Michigan and we get very cold winters!
WOWW!!! Thank you for sharing. I have tried rooting rose clippings without success. I going to try these methods this season and pray that I am successful. Thanks for the visuals.
Hi Pamela. I would love to get a printable instruction sheet for rooting roses from cuttings. thanks so much.
I like the idea of the clear cups to see if the roots have started. I had used the red Dixie cups with the punched holes, but your idea makes more sense and a greater aid in checking the cuttings. We’re trying to pass on cuttings of my mom’s roses before we have to sell the house, and I had hoped to pass these on to family and friends in memory of her.
Producing leaves before actually having roots is typical so as you say, don’t get into a hurry. They may not have rooted yet. Do you see any roots at the bottom? I don’t know which type of container you used but even if it is in an opaque container you cannot see into you can note when roots start to come out of drainage holes. For the best chance of surviving being put out into the garden, you do want them to have a good root system. You may not be able to put them out into your garden until late next Fall. To be sure, rooting cuttings is a long game.
Hi Pamela! This is the first time I took cuttings from each of my rose bushes and each cutting seems to have new leaves but not sure about the roots. However, I’m in no hurry to plant as it’s still cold and windy here in Los Angeles. Big Question: What’s next? I want to put these in the garden but when should I plant them? And, how should I take care of them when they are planted? Summer here is EXTREME sun and heat so should I plant, mulch and give them shade for a couple of weeks? I’d hate to lose them now as I feel like a proud Mama.I know that’s silly but growing things nourishes the soul, right? Thanks for all your great articles!
Use clean sand for the rooting medium, it is inhospitable to fungus, and treat the cuttings to a dusting of cinnamon before placing in sand. Cinnamon is a natural anti-fungal and can help tremendously. Make sure your pots and tools have been thoroughly cleaned and sterilized with a diluted bleach solution of 10 parts water, one part bleach. Fungal problems are the main bane of rooting plants! Keep trying, you can do this.
Every time I have tried to root cutting of roses without the humidity they dry out. Every time I have tried to root cuttings of roses with humidity the mold. What am I doing wrong?
Just be aware those shoots are very tender and take extra care to root before they can fall victim to many different things. Canes best suiting for cutting are ones that have just finished blooming, so they are semi-hard, not soft.
Thank you for this advice. I bought myself a cheap bunch of roses on the 6th of January and noticed they were shooting, so now I am going to take cuttings and get them rooting for planting this spring. I am hoping they will thrive and then I can gift them to others in my family. They are a beautiful white and I think if anything is wanting to grow, then give it a chance.
As a flower lover i can confirm that this is a really knowledgeable post you made there. Its really helpful, thanks for sharing.
So if you overwinter in an unheated garage how often do you water them
It is tough anymore to find it, try using sand or plain compost mixed with perlite or coco coir. You can also try straight coco coir and see if that works.
Great article! Can you tell me where you find “non pre-fertilized soil”?
I have a post on potting up rose cuttings here: Potting up Rose Cuttings
How did they turn out?
Hi. I’m wondering about some cuttings that have been cut a few days. I had to transport them a few states. Will this still work? Thanks
Approximately how long from planting a stem does it start blooming roses?
Hi Pamela,
I’m so glad I found your website- you have such awesome straight forward and very useful info on it, thank you!
I am a novice at rose growing but I was lucky enough to move into a home with a small rose garden already there! I am elated every time I look at it, walk around it and smell the gorgeous roses and share the pics w/ my friends! But I know very little about propagating them from cuttings as well as caring for the well established roses bushes.
1) I am following your instruction (found too late, unfortunately!) on cuttings. I now have the remaining 4 from 9 (5 are gone : ( ) Three of which I have put into a milk container as per your advice and so far they look much better than they did before! My last cutting that is still in a planter with a plastic bag over it, doesn’t create any humidity like the milk container/planter. It is about 14 inches tall.
*Should I cut it down and also plant it in a milk or other plastic bottle type container? It is still green all the way down the cutting, but so far is only sprouting a few tiny new leaves. I am afraid to mess with the soil to check for roots.
2) Of the established roses in the older rose garden, some are growing above my head! I am 5’6″, I’d say they are probably nearing 6 feet tall! They are still budding. Do I prune them down? When would be the best time to do that? And how low should I cut them?I saw another site in which the gardener clipped the living daylights out of his long stem roses and it looks so drastic and scary! I don’t want to ruin these beauties.
3) Some of the leaves on the established rose bushes are deep green and lovely! But some are getting spotted and yellow/brown. I am going to buy ladybugs but I don’t see a lot of aphids at all. Any ideas? If you ever look at photos to check out what your followers are writing about, I would love to send you a few pictures. Let me know.
Please advise whenever you get a chance. I hope you are well and staying strong and having a lot of fun in your garden!!
Thank you very much!
Alicla
Once the bloom has faded or wilted, as you say.
Pamela,
Is it best right after they bloom or after they “wilt” when the flower has died?
Thanks! 😉
TC
Thank you for showing it step by step. Such great content to read and helpful too.
Thank you so much for this tutorial! I have a black thumb but my 100 year old Grandma passed away last week so I snipped a few stems from the rose bushes she faithfully tended my entire life to hopefully root >> transfer to my Mom’s garden as a gift to her. I used the starbucks cup method and I’m only on day 2, but the greenhouse effect is working perfectly! It’s nice and warm and drippy inside the cup. Cannot wait to see if this works – wish me luck! 🙂
Hi! I’m wondering if I can enjoy my cut flowers indoors, and then use those same stems later for rooting? I can’t wait to try this!
Hello. I have done all this, a few weeks in and my rose stalks have new leaf shoots on them but I have no roots .. please help any advise will be great.
Wonderful article! Thank you for sharing! Have you ever had success growing roses from a bouquet?
I am so glad you found this helpful. The other method I use of air layering works very well too and you get a larger plant sooner. Here is the link to that post: Air Layering a Rose
It’s really nice to know your method. I’ll try this right away. Thank you so much.
Its hard to say, there are so many variables that can affect blooming. Amount of sunlight, temps, watering etc. Even the type of roses can be a factor. I get the best performance from a good compost over any synthetic fertilizer. I get mine from a local organic turkey farm, you might check if there is something similar in your area. The good thing about compost is it feeds the soil which leads to better plant health in the long run.
I tried to replant my bud roses for several years, but couldn’t I’ll try this method. Thank you very much for nice explanation.
Shall I ask one question, why my rose plants give only one rose at a time? I used NPK blooms and oskmote too.
Thank you.
There are many variables so it is hard to say. Does it have healthy growth and plenty of leaves? Maybe it is getting too much nitrogen.
Or is it failing all the way around? It could need a hard prune to encourage new leafy growth.
It could be getting too much water or not enough. Is it getting enough sunlight? Is it competing with neighboring plants. Do tree roots grow under it? (they are notorious for hogging nutrients and water).
And there are some roses that resent being pruned at all. Not many but some. Now that I have left you hanging with no real answers I guess you are going to have to try trial and error. Sorry I couldn’t be more help.
I have another question that is somewhat related. One of the parent plants is at least 40 years old. It has not bloomed in several years. Any suggestions on how to encourage the rose to bloom? It may be a grafted plant but I’m not sure.
You are never too late to learn about plants. I am always learning still and that is part of the fun! One thing is for sure, gardening is so relaxing if you don’t let the failures get you down. With rooting plants there are tons of failures but that is just the nature of it all. So double up the amount and if you get too many just give them away to others. You are most welcome and enjoy your gardening adventures.
If it is actively growing and it has roots you can safely remove the jar. You can plant them into a larger container to allow the to grow on if you need to. Fall is a good time to plant in the ground, it is usually cooler but there is enough time for the roots to become established before winter cold sets in. Some allow them to grow on in the pots for a year before putting into the ground.
This information has been very helpful. I have successfully rooted some roses that my father planted. One in the ground and one in a pot When do I remove the jar and when do I transplant them? One is getting too tall for its jar. I am in Zone 7.
Great write up! I know nothing about gardening and only now I’m trying to learn about plants(I’m 35, am I late?) but it all seemed too scary. Your article is the only one that gives me faith and courage to try. Thanks a million!!
The best time to take cuttings is right after they bloom. I am sorry you are having an issue but much depends also on the variety of rose, I am struggling myself with a rose that resists propagation. Some resist rooting no matter what. If you have access to the plant itself then try this method: https://www.flowerpatchfarmhouse.com/air-layering-to-root-roses/
Yes, I do use grow lights if I don’t have enough natural light. They work just fine.
Hi! I have a question. Can growing lights help with rose cuttings?. Because I’m having troubles with the right amount of light. Thank you!
I love roses too!!
I tried 40 over times but failed. The method is correct n there are shoot coming out but the stem becomes black n no roots. What should i do
Typically it takes much longer to actually root. More like a couple months or more. Keeping it in a humid environment helps it until you know it does have roots. Most cuttings will have enough stored energy to put out leaves quite quickly but that does not mean it has rooted. Give it another month and then check to see if there are roots, then you can uncover it.
Ho, thank you for the great read. I habe followed every of the steps you have in this great tutorial. I have one question though;
At which point do you take the cover lid off? There’s been a shoot coming out with tiny reddish/pale green leaves. About 2cm long. Them there’s another bud at the bottom waiting anytime now to open.
I don’t know whether it has roots yet as its only been a week or two. Currently growing indoors.
Do you habe any advice on when I should take the lid cover off and will it affect the new growth if so?
Planning to plant them out once with of the leaves fully matures. Do you think that’s late?
Thank you in advance and I love the roses! Lovely. x
My mom has chickens with a rooster so I got some eggs from her or you can order fertilized eggs from several hatcheries online.
Don’t know how you got the baby chick without a rooster around? Need a rooster to fertilize the eggs or no baby chicks. Sooooo how did the one come to be, or did you get some fertilized eggs? Too bad about the neighbor, I love to hear a rooster crow!
These are from Starbucks, I save my husbands Blended Frappucino cups.
Where to get the domed cups? Thanks very much.
I have yet to try to grow some from seeds but I have always thought that would be fun. I need to give it a whirl. Thank you for the encouragement!
I’ve started roses from seeds easily. I get rose hips in the fall, remove the seeds, clean and dry them. Refrigerate for 1 month then plant them in December or January in the basement. By April they are 8 to 12 inches tall.
Thank you for your posting. It is very beautiful.
I have rose patents. Roses out of patent are okay to do this but… years of work go into one cultivar
I have yet to try it with them but it does work with the majority of rose varieties, some take longer than others to root but eventually will.
Hope this helps you.
Can this rooting process be done with any Roses, such as Knock Out Roses?
Thanks,
Jean Clyburn
Growing from bouquets is hard to say as sometimes they are not suitable for starting. It is best to take cuttings from a live plant. Also do not have them in direct sunlight, they will not be able to retain moisture, they need to be in a shady location. I have never grown from seed myself, it just takes too long but I have read about it. To prevent over watering make sure the medium you have them in is very free draining.
I wish I could be more help. Rose starts don’t mind the heat if they are in shade, they actually will do better where it is warmer.
I am in zone 11-13 in New Delhi India temperature here today was around 35 degree Celsius either I over water the cuttings or they dry up in sun. What should I do, the stems I am buying are from bouquet.
How do I grow them please guide, also some idea about growing roses from seeds will be helpful I have brought about 100 seeds from china, but I don’t trust the chinese sellers
If you are going to be pruning your roses anyways it does not hurt to try but it is claimed that right after the first bloom and on into summer is the best time. I have not tried this early in the year yet myself but I am never afraid of experimenting. In fact I probably should just for the hey of it. 🙂
can the cuttings be taken any time of year? how about march in zone 6?
It can take from 3 to 8 weeks, depending on conditions and type of rose. I have had some take longer but I assume it was because the weather turned cold and my greenhouse is not heated. During the very active growing season like June and July (for me in N. Calif) is when it takes the least amount of time. But again, variety of rose can play a part as well.
About how long does it take until roots grow? I have had my cuttings in soil about three weeks and there are leaves but I don’t see roots.
This time of year they can actually root sooner because of the warm temps. I overwinter mine in my greenhouse but you can actually put them right in the ground once rooted well. Keep them shaded for a couple weeks until they get settled. I would mark where they are at a (they won’t be very big so a nice stick in the ground will remind you come Spring where they are.)
Mulch them to keep weeds at bay and you should be good to go.
If you would rather keep them in pots then bury the pot in soil so keep the roots from freezing solid or you can overwinter them in an unheated garage. I hope this helps.
It is now july 3rd. Is it too late to start rose cuttings this summer? i live in southern ontario cda.
Yu said it will take 3 – 4 mths before ready to be planted into garden.
What do i do with them because it will be winter/fall in couple of mths?
Maggie
It depends upon the time of year. It may help you to do them in the clear plastic cups, then you can see the roots at the bottom when they have developed. I always lose some too so that is normal, but I get probably 60 to 65% to root. 3 months is a good rule of thumb. Early spring cuttings are more vulnerable than ones taken after the first bloom. The ones I start in Late Fall take all winter and don’t typically show any results until April. The ones I take mid summer are usually rooted by Fall. I leave them in their little starting pots until they develop good strong roots which is probably another 3 months or more.
How long should it take for the roots to start growing before i can plant them in pots?
Pamela, I’m a new viewer of everything you do and I’m in love with it all, you are so talented. I have learned to paint canvas pictures from you that all my family loves. Thanks so much for all your great information. I have a question about the rooting roses post. How long should it take for roots to grow before i can replant them in pots? Previous tries I’ve made to propagate anything has always resulted in rotted ends with no roots growing but i also have never used a rooting liquid to dip them in which i am excited to try. Just how long should i leave them to root before dumping dirt out and looking for the rooting I don’t want to do it to early and disturb the process. Thanks again for all your post, especially using pictures for every step that is a great help!
Plus, you get all the fun starting these new roses. I would take 5 or 6 slips or cuttings from each volunteered plants. The more you try the better success rate you will have.
That is an absolutely fantastic idea! The town could put the request out in the village newsletter.
You are most welcome, Denise. I love sharing the fun of flowers and gardens.
It is just plain fun too. Sounds like you have a great plan to rejuvenate the village gardens. You can also ask around, there may be other old roses that thrive that neighbors have in their gardens. It might be fun for them to see roses taken from there gardens around the village too.
Boy, did I need this. The old shrub roses in the village gardens that I take care of have always do well. I’ve lost so many other perennials over the last two cold winters, that I have spaces to fill in and the village has no money for replacement plants. I printed this out. Thank you, dear lady! -Ginene
Thank you for the information. The flowers are very beautiful.