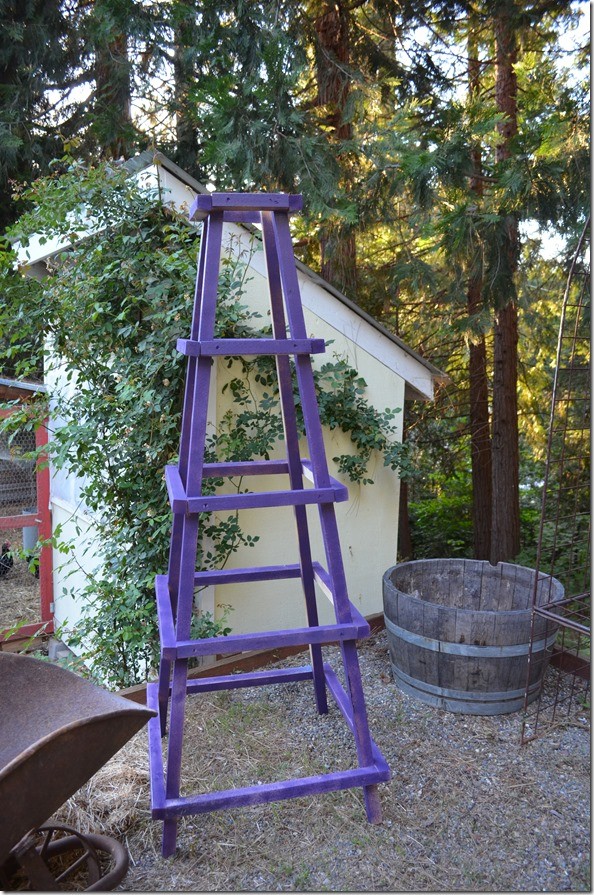
Easy Garden Obelisk
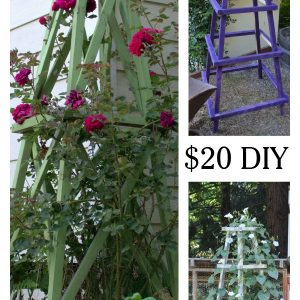
Easy Garden Obelisk – a great and inexpensive DIY! This obelisk can be used in your garden for roses, sweet peas or even squash. Some call these Tuteurs but they are the same.
There are so many things you can use this easy garden obelisk for. I have even made an arbor from them for my Secret Garden and last year I used it as a tomato cage, it worked great! Plus it was so much prettier than my wire support cages.
Why do I call it easy?
Because unlike many of the obelisk plans I found online this one has no angle cuts yet looks great in the garden. It gets covered with vines, canes, and other plants that steal the show and you don’t really notice how the obelisk is built.
I need fast and easy with my DIY’s and this fits the bill. What is so wonderful is anyone who can hold a screw gun can put this together.
Don’t have a saw? Many big box home improvement stores will cut the lumber for you.

This post contains affiliate links. If you make a purchase after clicking a link I may make a small commission at no cost to you.
Just FYI: When we first built this the cost was just under $20 for materials. Building materials have shot up in price in 2021 and it may cost you more. Prices are relative to your locale as well.
Materials to build Obelisk
- 8 8 ft 2 x 2’s (usually pine or fir)
- 3 inch wood screws
- Exterior wood glue
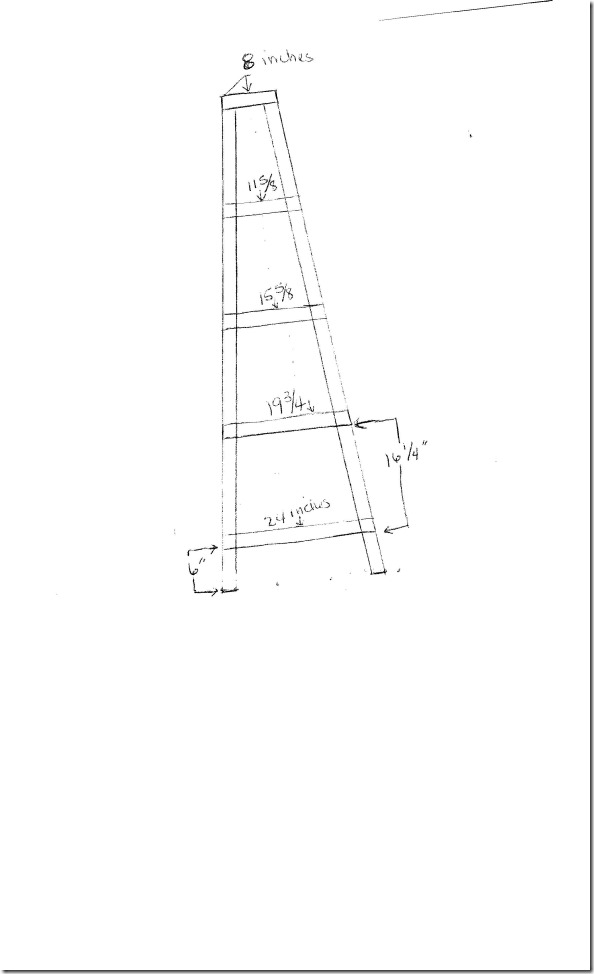
Obelisk Cut list
Legs 4 – 2 x 2’s @ 72 inches long
Rungs for ladders – 2 pieces each at:
- 8 inches
- 11 5/8″
- 15 5/8″
- 19 3/4″
- 24″
Side rungs to attach ladders together 2 pieces each at:
- 11″
- 14 5/8″
- 18 5/8″
- 22 3/4″
- 27″
There is a printable card below with the materials listed.

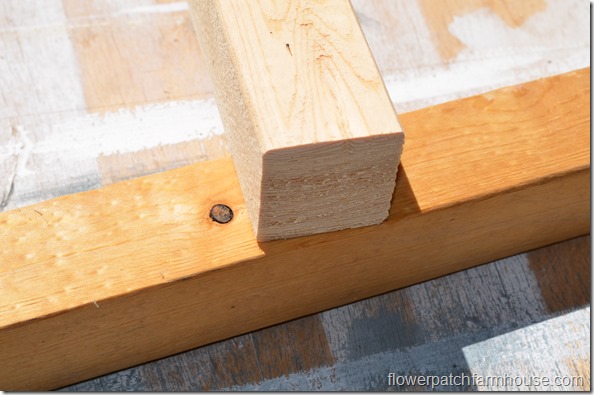
Important: Pre-drill holes for screws. This will prevent splitting of the wood. Use a smear of wood glue at the juncture of each piece for added durability. Since this is an outdoor item it should be an exterior wood glue.
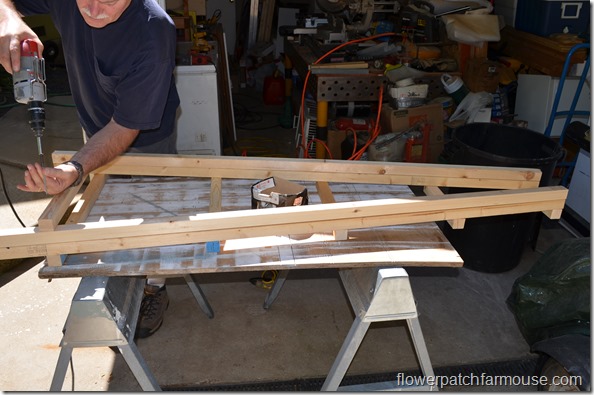
Build first side of obelisk like a ladder
Start by building the first “ladder”.
Lay 2 of the 72″ pieces on a flat table or surface. We used the edge of our makeshift table as a straight edge.
Measure up 6″ from the bottom of both legs (72″ pieces) for placement of the bottom rung or crosspiece.
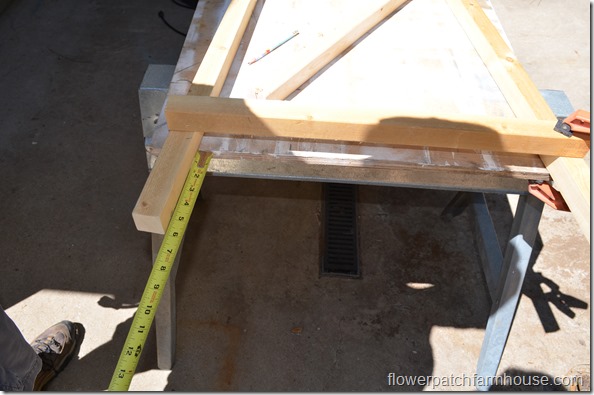
Since the legs are at an angle and the cross pieces are cut square only line up the top corner to the edge of the leg.
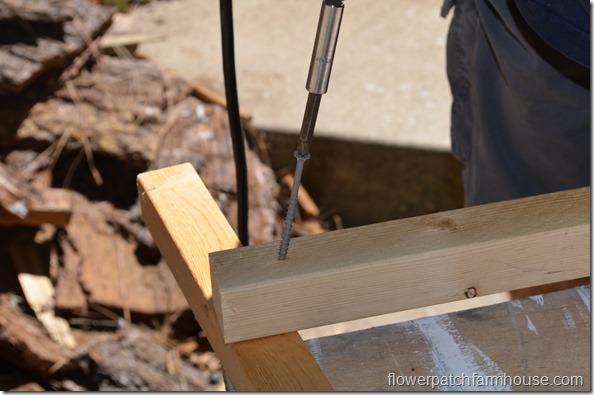
Next fasten the top piece in placeStart (8 inch piece)
Starting with the bottom and top rung help stabilize this section.
Note in the photo below how the rungs do not line up with the edge of the legs.
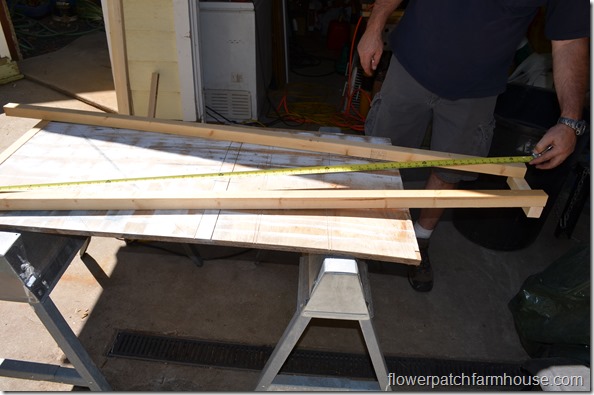
Check for square.
To check for square you take measurements on the diagonal and adjusting the legs until the measurements match as closely as possible.
This adjusting is called racking. This means you push on the corner that has the longer dimension (if they don’t match already) by half the distance.
Example: If one side is 1/2″ longer push the corner a 1/4″ then remeasure (this is not an exact science but it will bring the obelisk closer to square). Keep racking until dimensions are equal or very close.
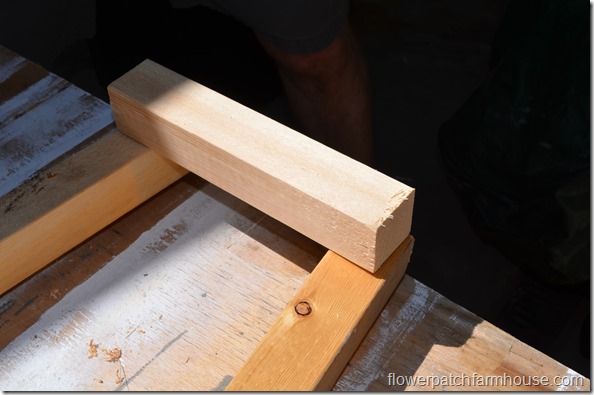
Evenly space rungs
Attach the rest of the rungs evenly spacing them. (you could space them unevenly if you wished this is just how we did it)
To evenly space them measure from the bottom of the lowest rung to the top of the top rung.
Divide that measurement by 4 to get placement of the rest of the rungs.
This one the rungs needed to be 16 1/4″ apart. Mark the spots to attach each rung.
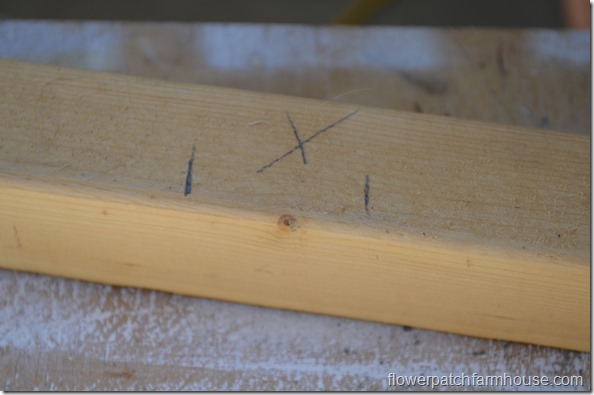
The measurements from the bottom rung is 16 1/4″, 32 1/2″, 48 3/4″
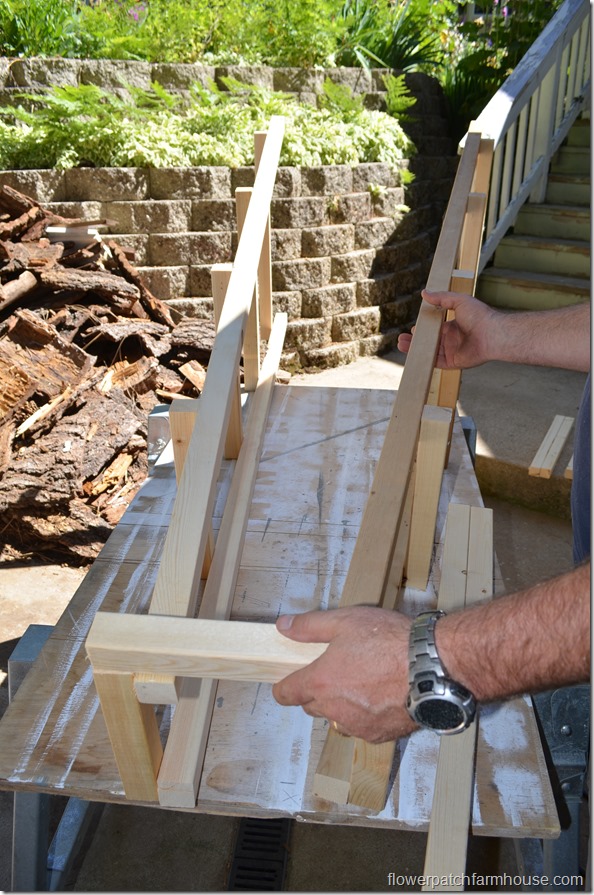
Now the first ladder should be built
The second side or ladder is much faster to build since you use the first as a template.
Lay out the parts on top of the first built ladder and just put it together.
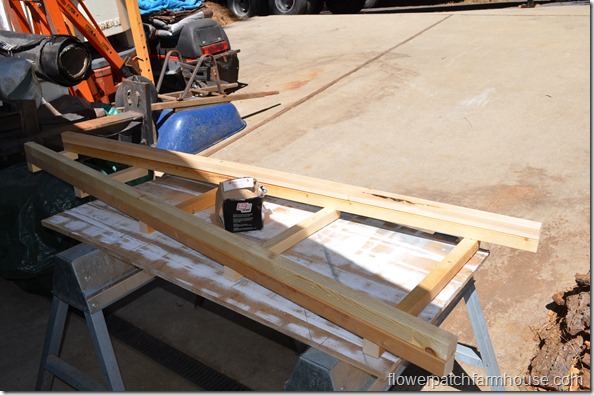
Lay the legs on top of the first ladder legs then attach the rungs matching the first ones and the second ladder will be complete. (you do not have to be exact)
Attach the side rungs of obelisk
Lay the ladders on their sides. Attach the side rungs following the layout of the rungs on the ladder pieces.
This is where you will see why the side rungs are 3 inches longer than the ladder rungs. They overlap the ends of the ladder rungs covering their ends.
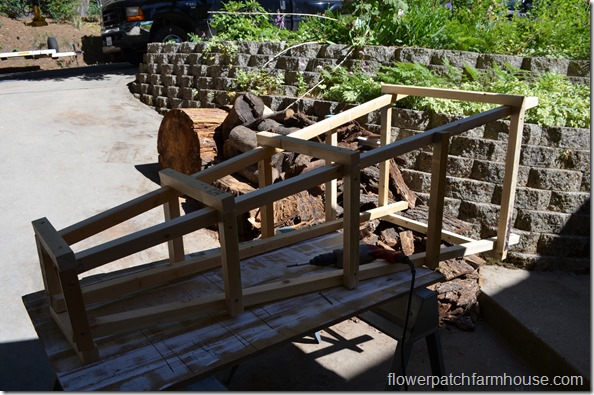
Flip the entire thing over and attach the remaining rungs.
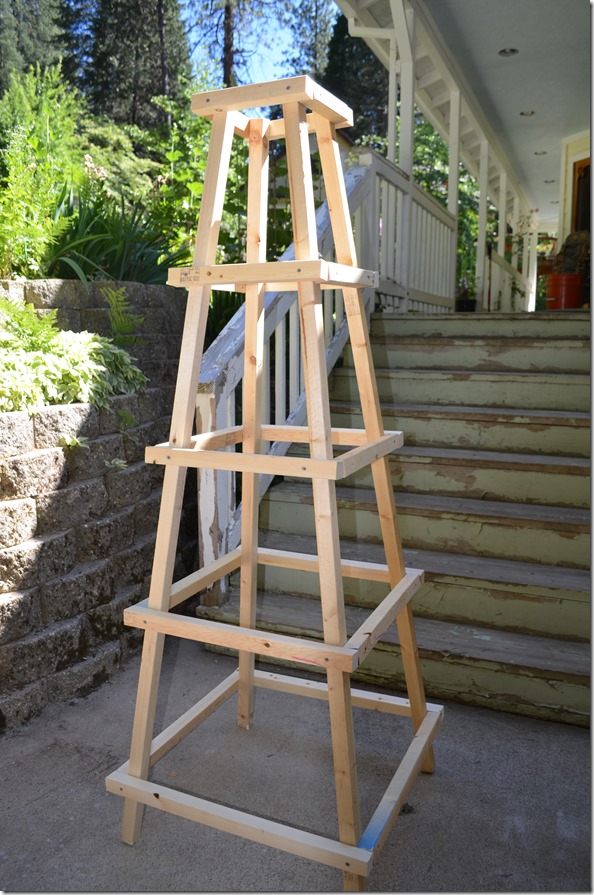
Finishing touches
On this particular obelisk, the top is on the larger side. I wanted this so I could put something up there, even a potted plant.
There are so many ways you could add a finishing touch here. Find or cut out a silhouette of your favorite farm animal, put a windmill on it, or find a weather vane to attach.
You can paint this any color you wish or stain it. I used organic tung oil on some of mine and it really helps them hold up for years even though it is built out of cheaper wood.
We built this one over 5 years ago and it is still in fantastic shape.
When we built this the price of the 2 x 2s at 8 feet long was $2.30 each and that was 5 years ago so I really do need to find out what they run now.
Easy DIY Garden Obelisk
Materials
- 8 – 8 ft 2 x 2’s (I think these are pine or fir)
- 3 inch wood screws
- exterior Wood Glue
Tools
- Miter saw
- Screw gun
Instructions
Cut 4 - 2 x 2’s @ 72 inches long (legs)(you can adjust to height you wish)
Rungs for ladders:
2 @8 inches,
2 @11 5/8 inches,
2 @ 15 5/8 inches,
2 @19 3/4 inches,
2 @ 24 inches
Second set of rungs to attach ladders together:
2 @ 1 1 inches,
2 @ 14 5/8 inches,
2 @ 18 5/8 inches,
2 @ 22 3/4 inches,
2 @ 27 inches
Lay 2 of the 72 inch pieces on a flat table.
Measure up 6 inches from the bottom of both legs for placement of the bottom rung or crosspiece.
Pre-drill holes for screws. This will prevent splitting. Fasten the rung to the legs (24 inch piece).
Since the legs are at an angle and the cross pieces are cut square only line up the top corner to the edge of the leg.
Start with the top (8 inch piece) and bottom rung to stabilize this section.
Now attach your other cross pieces or rungs. Measure from the bottom of the bottom rung and the top of the top rung. Divide that measurement by 4 to get placements for the rungs. Ours were 16 1/4 inches apart.We marked the spots for each rung.
The placements of the rungs is from the bottom rung at 16 1/4”, 32 1/2” 48 3/4” Now you should have your first ladder built.
Use the first one as a template. No measuring or figuring for the second ladder.
Lay the ladders on their sides to attach the side rungs.
This set of rungs are 3 inches longer than the ladder rungs, they will overlap the first set covering their ends.
Repeat for the other side.
Paint or finish with a protective oil/stain.
Notes
You can adjust the size as you wish.
Happy building!
Subscribe to my youtube channel
Make sure you check out this super easy Arbor we built from this Obelisk Idea!
Hi, I’m Pamela
With 45 years of hands-on gardening experience, I love sharing practical tips, proven techniques, and inspiration drawn from my own gardens. My goal is to nurture your confidence, spark your passion, and help make every step of your gardening journey more enjoyable.


I saw this last night and couldn’t wait to build them. I built four today. I changed the plans a bit. I made mine with the inside between the four corners was 2 foot 9 inches, that way I can put a tomato plant next to each post and keep them 24 inches apart. I love these!
Make it foldable for storage is an excellent idea. Let me know how it goes!
I think this will work fantastically for my indeterminate tomatoes!!
I’m going to ask the hubster to modify it a bit with hinges to allow for easier storage. I hope it’s possible.
Thanks again for the idea ?
Thank you!! I built this last year and planted moonflowers around and in the middle of it. I’ve never built something out of wood before this! I got the lumber at our small town lumber yard and white paint & primer in one. My husband showed me how to use the “chop saw” and the drill and power screwdriver.
I did it! It was perfect! I wanted to buy a climbing rose for it this year but money is too tight. Just came back to say thank you! ♥
Great project to build on a Sunday afternoon. Just finished building one;so easy. Just gotta find what color to paint. I see many more being build for the wife’s garden.
No, I haven’t. That sounds so interesting. I am sure it will be lovely once your vines fill out and bloom. Let me know how it goes for you.
Have you ever built one to fit around the base of a tree? We plan to make one to add color and interest to the trunk of a very tall and boring palm tree! I plan to grow flowering vines on it .
That is a great idea. And who says you can light it up only at Christmas, wouldn’t that just make a great garden element. I may try it myself to light the garden at night.
I’m planning on building this to use as an outside Christmas tree. I need something to hang my Christmas lights on as most of my trees are too big or too far from my house. Then I can use it again in the summer!
Hello Pam. I can’t thank you enough for your tutorial. My husband just finished making the obelisk (I would very much like to post some pics but I don’t know how) and it looks absolutely beautiful. I’m in the seventh heaven right now. He used all your husband’s measurements and the whole project took him around two hours. We added a woden finial on top that we purchased at Home Depot, so it’s really pretty. Now it’s my job to stain it. I think I going for a dark brown to add some contrast to the climbing plants and to make the colour of the flowers pop. Thank you again!
I do love mine and how versatile they are in the garden. Prettier than regular tomato cages and very sturdy!
Thank you for step by step how to build one, this is very neat for my garden.
We just finished building an arbor made from two of these. It is soooo wonderfully easy and inexpensive too compared to what is available to purchase. I can’t wait to share it.
stayed tuned, I am coming back with an arbor made from these easy obelisks. It is so great and as easy to build on a budget! You are most welcome.
Pamela your garden obelisk caught my eye at The Scoop party. I need a few of these in my garden and appreciate the easy to follow tutorial your provided. Pinning this for inspiration – thank you!
Love this!! Don’t be surprised if you see me copying this, I have always loved these but never wanted to pay top dollar for them.
You two did a great job!
I do not have them anchored but if I did I would hammer some maybe 12 inch or so rebar into the ground and wire each leg to that. Drive the rebar into the ground about 6 inches or more and have enough above ground to attach the obelisk legs to. I have not tried this myself yet, but we don’t usually get big winds here, we live in the middle of large 200 foot trees which buffer the wind. Hope this helps. 🙂
I just finished building one of these. I followed your directions most for most of the project but drifted a bit to make things easier with the tools I had to work with. I love how it looks and am still in the process of deciding what color I may want to paint it. But one question…..did you anchor it to the ground at all? I used 2 X 2 uprights but only 1 X 2’s for the cross pieces because I forgot to make a shopping list before I went to the store. So mine might not be quite as heavy as yours. I am afraid it will blow away if we get a storm. I am racking my brains trying to think of a simple solution and would love to hear any ideas others may have
For an heirloom tomato like Brandywine one would be great in the center or plant one on either side to make it work for two. For cucumbers I planted one by each leg so it worked for 4. Right now I am making some shorter ones using 1 x 2 furring strips. I will share that soon as well.
I am new to gardening. So I was wondering, would this be used for just one tomato plant or several? Also thinking of using for my cucumbers. Just trying to see how many I need to make. Thanks
You are quite welcome, Jamie, and thank you. They do make a nice way to trellis a climbing rose or give height to your garden, also make it a fancy cucumber support. I have a few more designs up my sleeve I want to try this year.
Well, I didn’t know what an obelisk was until reading this post! I have seen those…but never heard the name before! This is so much prettier than the ones I have seen! Thanks for sharing the directions!
Neat. Would look amazing in the garden and its my fav color. Great job.
We stumbled over here coming from a different web address annd thought I might as well check things out.
I like what I see so i am just following you.
Look forward to exploring your web page yet again.
This is one of my most popular posts of all time. I think many people like the ease of building it without having to fiddle with angle cuts. Thank you!
Thanks for sharing! This was chosen as a favorite on our From the Farm blog hop!
I am finding mine to be quite useful and very decorative in the garden. I am making a couple more in different sizes for some roses that need a bit of support.
I let mine sit out all winter to test its durability. It is still in great shape but I did need to glue it a bit again as the screws loosened slightly. I am working on one made out of rebar now.
What a great idea, I think adding a birdhouse is just the ticket. I know I have one around here somewhere. thank you!
Saw the plans for this last week – thought it looked pretty simple. My husband bought the materials and we put it together this weekend. Added a large birdhouse to the top and it’s just adorable! Thanks so much for sharing these plans.
Finally!! Somebody has shown us a simple obelisk that we can all build. I’ve hesitated because of all the angle cuts. Pinning this one!
I have wanted to make one of these for a long time. Thanks for the instructions!
I have another obelisk we did with an X pattern on the side instead of ladder like, check it out if you wish, I think I live it even better.
Lovely colour and instructions look easy to follow, thanks for this, you’ve given me a great idea!
I know, I like fast and easy. And it still looks great too. I was tired of ugly tomato cages and even those these are made of pine/fir they will last for a long time if maintained. You are welcome, I also did another post with a slightly different design. http://www.flowerpatchfarmhouse.com/make-an-easy-obelisk-2/ Just in case you hadn’t seen it yet. I would enjoy it if you sent me a photo of yours when you get them done. 🙂
LOVE LOVE LOVE! I too am so aggravated by all those angled cuts!This is EXACTLY what I’ve been searching for to build for my gardens THANK YOU! I WILL be making a bunch of these!
We just set ours on the ground but thought about the points for pushing into the soil for stabilization in wind. Though they are so wide at bottom that we have not had any issues with that yet. We also considered attaching some pieces of rebar to sink into the ground since these are made with pine/fir and would not last long under ground. If they were cedar or redwood they would do better in the ground but that drives up the $$$ and we were going for cheap. 🙂
I love it!
We purchased two similar obelisks last year at a nursery, they don’t have any this year. The ones we bought have long pointed feet so they stick into the ground and are perfect for raising tomatoes!
This year we plan to make some with long wood and paint sticks as cross pieces…..
Thanks for your post.
Nancy
I love mine, both of them and I plan on making more this coming season. Please do share when you make yours.
Love the color you painted this. I so want to create something tall like this for my garden this spring/summer. Thanks for inspiring me!
Hello from the Mega Spring Linky!
Leelee @ paperbagstyling.blogspot.com
I am hoping for more rain this Spring as we are in drought conditions but it will be a happy one no matter what! I have decreed it.
Fun! Love that purple color too! Wishing you a happy Spring!
Thank you. I just typed out what my husband had written as far as dimensions without double checking his math. 🙂 Plus I noted that my formatting for the entire post had gone wonky but now I have fixed it.
Second to the last when putting the sides on is incorrect. It is listed as 2 – 24 3/4 inches and it should be 22 3/4 because that is 3 inches longer than 19 3/4
I have ideas for a couple variations that I want to try. As soon as I get them done I will post them too.
Thanks for posting this. I need one badly because I bought a rose last year and this year I found out it was a climber!
Sherry
Hi Pamela, just hopping back to say that I will be featuring you at SYC today. I am giving you a double feature. Also hi-lighting your Foxgloves post. I noticed (sure unintentional) that there is no link back to SYC on that post. Would love if you could add it.
hugs,
Jann
I know it would last longer made of cedar or redwood but this is what I had on hand. If I keep it painted maybe it will last a few good seasons. By then I am usually ready to change things up anyways.
Pamela, I love your obelisk! I use to have a couple of them years ago, but they finally bit the dust. Funny thing, I just asked my hubby today if he would make me some new ones. Thanks for sharing this great tutorial with SYC.
hugs,
Jann
Looks easy enough, and the cost is right. Thanks for sharing your building plan; I would paint mine purple too.
Very effective piece… I’ve been wanting to get at some of these for some time and will bookmark your post as a reference…. Larry
What a great project! It would look cute with a flying pig on it! I love flying pigs!