Indoor Seed Starting for a Beautiful Garden
Indoor seed starting for a Beautiful Garden. Have you ever wondered if germinating seeds indoors is easy for beginner gardeners?
Starting plants from seeds is a budget-friendly way to get tons of gorgeous plants for your vegetable and flower garden.
Have you ever wondered how to start seeds indoors inexpensively? Indoor seed starting is a fast and easy way to get tons of flower or vegetable plants for less money than buying at a nursery or garden center.
You can fill your garden on a budget and have to satisfaction of growing varieties you just can’t find elsewhere! And it is easy for beginner gardeners.
This post is on how to start seeds early indoors before the day length has reached 12 hours. Why does it matter? Because seedlings won’t do well without supplemental light before there is more than 12 hours a day of sunshine.
So if you are looking to start seeds without lighting wait until after the Spring Equinox and or the day length is over 12 hours. That will be determined by where you are located in relation to the equator.
What we will talk about today:
- Why Grow from Seed
- Reading the Seed Packet
- Seed Starting Station or Rack for a lot of plants
- Seed Starting List
- Seed Starting Trays or Containers
- Labeling
- Seed Starting Soil
- How to Germinate Seeds
- Best Way to Water Seeds before Germination
- Grow Lights
- How Often to Water Seedlings
For how to direct sow seeds in the Fall for Spring flowering read this post, this is super easy way to get started!
Or another nifty trick is Winter Sowing, which is super fun and easy too.
Growing Seeds – Why?
I especially love heirloom types of flowers and vegetables that are hardy, easy to grow, and unusual.
Ones you can’t normally get in your local garden center. So I need to start my own seeds.
Not only is growing from seed an easy way to get flowers and vegetables you can’t find in garden centers but it is deeply satisfying to watch the process from seed to plant.
Also, there is the budget factor. Once you have everything you need it is a cost-effective way to garden.
Starting seeds indoors is especially helpful if you grow a cut flower garden for income. Getting flowering plants started earlier means you can start selling bloom sooner.
There are many ways of growing seeds and I have tried a good many of them.
So I am going to let you know what has been the most successful for me in getting really strong seedlings that grow into gorgeous sturdy flowers or veggie plants.
Read the Seed Packet
This is a great place to start and I have an entire article on how to Read Flower Seed Packets (this works for vegetables too)
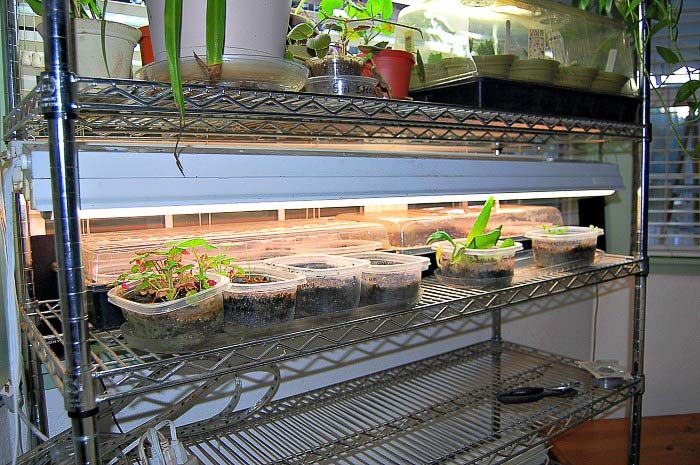
Indoor Seed starting rack aka Germination Station
The seed starting rack I have nick-named the Germination Station as this is where much of the action happens.
This metal shelving rack has been the best way to save space and start many seeds at once.
You can certainly start on a smaller scale with a couple of shelves. Or one. This rack works so well as it is wide enough to hold the
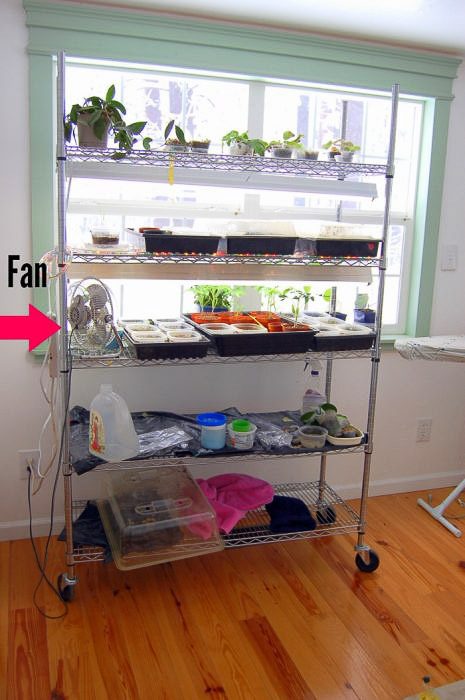
I will tell you about the fan later.. I have had this planting rack in my dining room, living room, upstairs spare bedroom, and in the greenhouse, wherever the mood strikes me.
This rack is awesomely easy to move where you need it. It also breaks down easily for storage when you don’t need it.
I got this one at Costco…I think they are about $90 now, they were $75 back when I purchased mine about 10 years ago.
They last forever. (watch for sales at Costco, my hubby just picked this up at Costco for under $70)
List of items you will need for indoor seed starting:
1. A rack or shelf of some sort to hang grow lights above your pots
2. Bottom heat using a plant heat mat. (this is helpful but not absolutely necessary)
3. Sterile containers or seed starting trays for planting in (I like re-purposing containers but these are great too)
4. shop lights with Ott or Grow light bulbs (if you use regular fluorescent bulbs get both cool and warm ones so your plants get the broad spectrum of light) or if you want to spend some $$$ get some LED grow lights.
5. Sterile seed starting mix or good potting soil. Sterilize regular potting soil yourself by pouring boiling water through it then let cool before using.
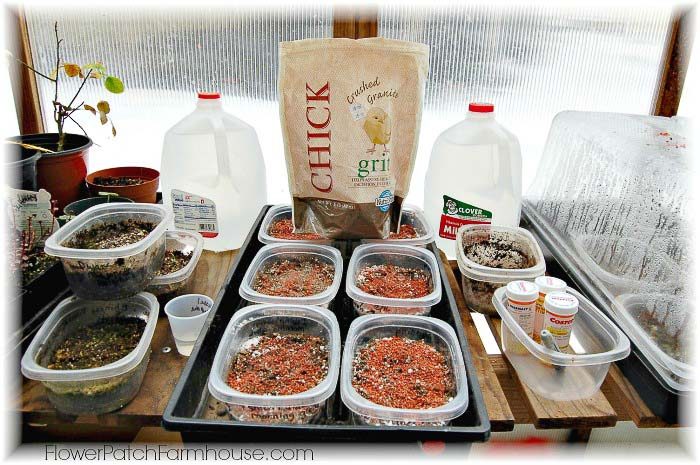
6. Chick grit (available at feed stores or online), horticultural sand or vermiculite available at garden centers or big box stores.
7. Seed trays for your containers to sit in for bottom watering (mine have the clear lids for keeping the moisture in but I will tell you a trick to use if you don’t have those)
8. Small fan
9. Perlite
Seed Starting Trays or Containers
Most folks say to start seeds in their own little pots, whether they be the little peat pots, the little squished tabs that balloon up when you add water, or the plastic six-pack containers, the theory being you won’t have to disturb their roots when transplanting.
After trying those methods I found I have better success when I plant many seeds in the same seed starting trays and let them grow up together for a while.
The glorious container I have had the best success rate with is the lowly plastic tub (I recycled some we had but I also like the ones I linked to below from Amazon)
Lately, I have been using Spring Mix salad containers as my seed starting trays. They are easy to pierce holes in and they have a lid to create a mini-greenhouse effect.
It is recommended to clean and sanitize them with a 10% bleach solution to kill the chances of fungus or other bad germs getting to your precious little seedlings.
A 10% cleaning solution is made by mixing 1 part bleach with 9 parts water.
But I confess to using good old soap and water. I like Dr. Bronners Castile Tea Tree concentrate. (hint: I also use this to make my insecticidal soap)
To create drainage in my seed starting trays I poke holes all along the bottom of the tubs with a drill, hot pointed tool (I use a skewer or an old steak knife), or nail.
I stack several together upside down, so I can drill the holes in many tubs at the same time.
If burning with a pointed tool, make sure to work in a well-ventilated area. The fumes are quite strong.
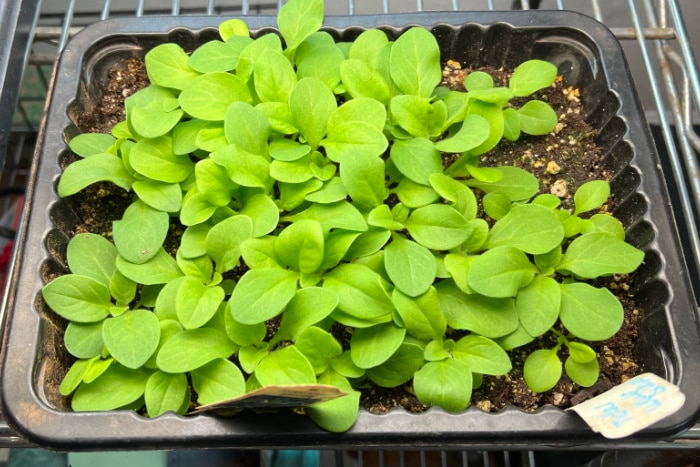
Another space-saving container is a shallow tray. You can fit a lot of germinating seeds in less space when you start seeds in trays.
Label your Seed Starting Trays and Containers
I write the name of what I am planting on the side of the tub, trust me you will forget if you do a lot of them.
I just use a Sharpie but some have told me they use a paint pen as it will last longer.
Keep a garden journal and list what you have planted and what container they are in. I map it by keeping track of where the containers are on the plant rack.
my garden journal
Printable Garden Journal
All the pages and a 12-month calendar so you can keep track of your garden endeavors! Seed starting record, garden planning pages, and more.
Or you can use small plant markers. You can re-use labels that have come with plants you may have purchased.
Just be sure to sanitize them the same as the trays and containers.
Note: I have tried using wood popsicle sticks but found they encouraged mildew. I have not tried sanitizing them in bleach yet but thought I should let you know in case you heard using wood popsicle sticks is an option.
If you have a trick to using them as plant markers, please let me know!
Seed Starting Soil Mix
Germinating seeds in the soil can be done in many ways. One of the best things to make sure of is the seed starting soil is sterile.
This inhibits soil-borne pathogens from harming the delicate seedlings.
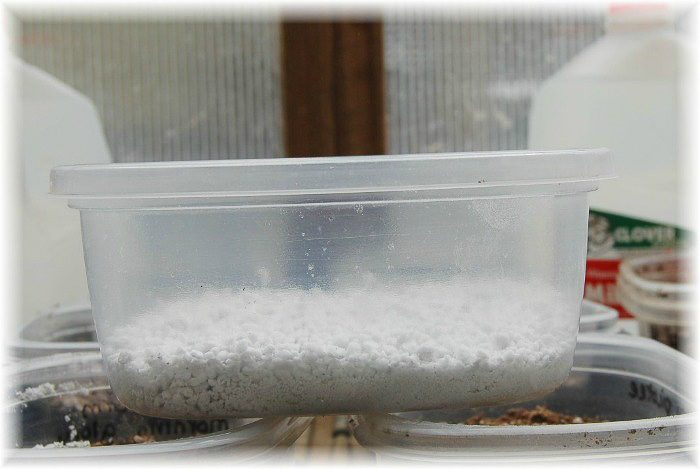
I add an inch or so of perlite to the bottom of the tub for good drainage. (optional)The beauty of adding perlite to the bottom of the seed starting tray is that the perlite holds oxygen which seedlings need.
Most beginners tend to overwater, perlite helps prevent the baby plants from drowning.
Next, add the seed starting soil…a nice loose mix..about an inch or so is good.
Use warm water to moisten it all very well. (some seed starting mixes are so powdery I have to soak them with the warm water for a couple of hours)
Related: Seeds Starting Mix vs Potting Soil, an experiment
How to Germinate Seeds
Generously add the seeds to the soil. Finer seeds I just scatter on the top and press into the soil. Read the instructions on your seed packet for each type of seed and follow them.
Make sure your hands are clean, free of lotions, creams, or oils, anything like that can affect the germination of the seeds.
Larger seeds need to be spaced apart about an inch and pressed into the soil a little deeper, I don’t necessarily bury them, just press them in firmly.
Next, add a thin layer of chick grit to cover the seeds. The amount you add depends on the seeds, that is where you read the packet instructions again. (You can also use horticultural sand or vermiculite, in the video, I am using sand)
Why add the grit or sand when starting seeds?
Chick grit is said to discourage damping off, a fungus attack on your baby plants that can and will kill them off en masse. Chick grit is crushed granite and works great for me. The sand has the same effect and also discourages fungus gnats. The sand or grit also retards evaporation which keeps the soil moist. Vermiculite is also an option.
Related: Get Rid of Fungus Gnats Safely
Watering in your seeds
Very gently moisten the chick grit by either spraying it with warm water or super carefully watering from the top. I have a cheap little spray bottle from Wal-Mart from the dollar bin. The well-moistened medium beneath should already be wet enough for the grit to get wet with the tiniest help.
Cover with a clear plastic lid. I have the trays with the lids but you can also just place another tub on top of the planting tub to create a mini-greenhouse, I have done that too, just be sure to have something underneath the tub to catch the water, you can use another tub for that. One that is not perforated, of course. You can also use clear plastic wrap.
From now on you should only water from the bottom. With the clear plastic on top, you should not need to water that much if at all before the seeds germinate. (you can spritz with a spray bottle instead if you wish)
We will cover how often to water your seedlings below.
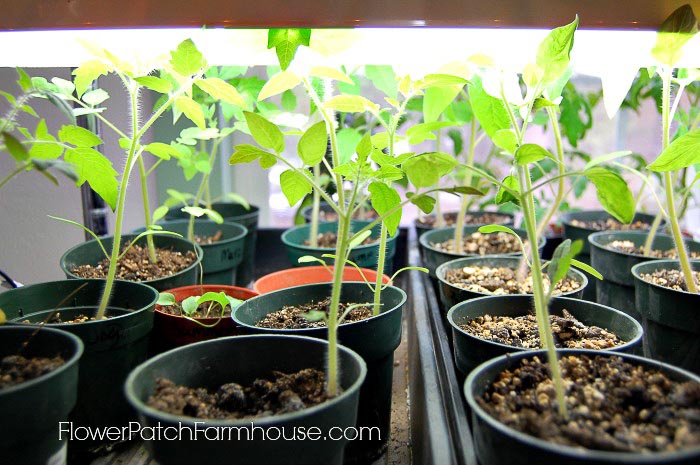
Grow Lights for Seed Starting
For a very long time, the grow lights I have used for seed starting was regular shop lights with OTT brand fluorescent bulbs.
Other bulb types have been the cool and warm regular fluorescent bulbs. They have worked just fine even though the newer LED grow lights meant for seed germination are said to perform better. Plants grown under these lights are heartier and more robust.
The downside to getting the ones that really make a difference is you need to get the pricier ones, I have found the cheaper LED grow lights do not really put out any better light than the fluorescent less expensive ones.
But for those starting on a tight budget, the economical shop lights and fluorescent bulbs do work great.
I hang the shop lights from chains (come with the light most of the time) and attach them to the racks with S hooks.
I have the light you can see in the front and one behind it to bathe the entire area of the plant trays filled with the planted plastic containers. (some only use one light fixture per shelf.
Your lights should be as close to the seedling pots as possible, you will raise the light as the plants grow.
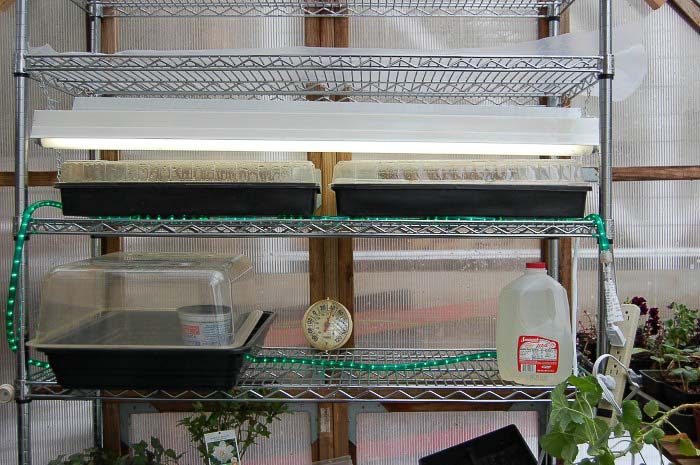
You can also see a green rope light snaking along under the trays. These were some of the Christmas light ropes that were not LED, they gave off mild heat. (LED lights don’t give off heat and I can no longer find ones that are not LED)
I lay it out in an S pattern on the rack shelf, you can’t really see that but trust me. This added a bit of bottom heat to help with seed germination.
If the room or environment you are starting your seeds in is already warm you won’t really need this. (My green lights died on me, I use heat these mats instead)
Keep a close eye on your starter pot. lift the lid of the trays to let air in from time to time. Air circulation is a must. Before you know it you will see this…seeds germinating!
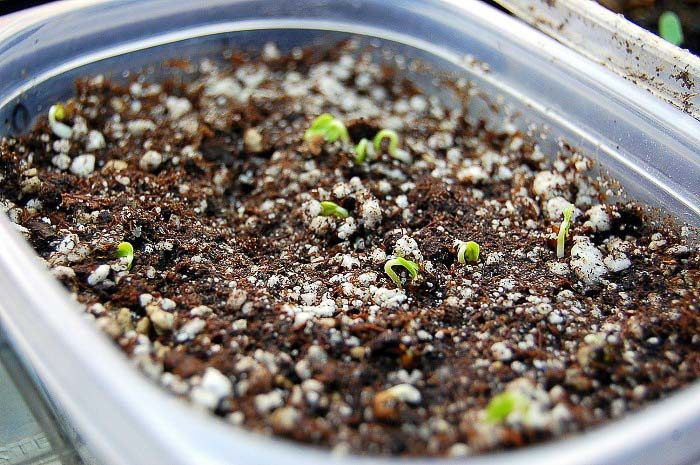
Watching seeds germinating is so exciting!
What a thrill that is!
When you see them sprouting remove the lid and you no longer need the bottom heat.
You may have seeds that have different germination time frames so when you seed, keep plants that have the same germination time frame together. When they sprout you can uncover the tray.
In the photo below you see the trays in the back still covered and the planted pots in front outside of the trays.
How Often Do You Need to Water Seedlings?
After germination, you will need to keep an eye on the seedlings to make sure the soil they are in doesn’t dry out.
So how often will you need to water your seedlings? That depends on the container in which you start them.
If it is a deeper tub rather than small six-pack type containers or soil blocks then you won’t need to water as often.
Smaller size cells will most likely need watering every day. But many conditions can contribute to the frequency of watering.
How warm is the room or area you have the seedlings? Do you have airflow, like a fan close by?
Both conditions can affect how quickly the soil can lose moisture.
Germinating Seeds in a Paper Towel
If you are worried about your seeds being too old or not viable some like to germinate them in a paper towel. I personally prefer a coffee filter.
The tiny roots of the germinating seed are less likely to get embedded in the coffee filter. For more on how I do this see my Starting Delphiniums from Seeds Post

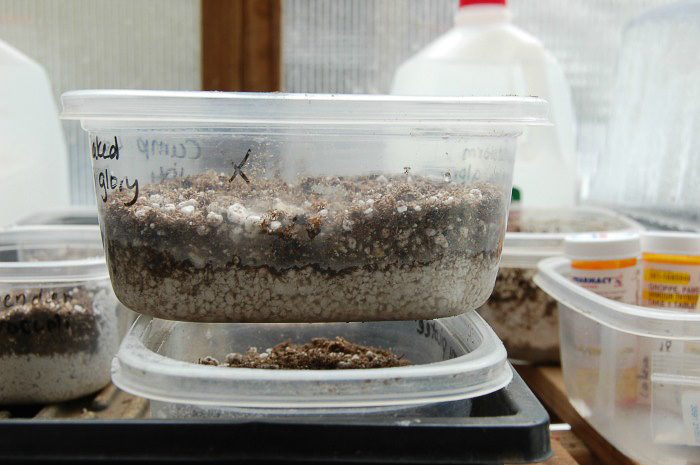
Why a Fan?
Now for the fan in the first photo, that is to provide air circulation and a bit of stimulation for the plants. The movement of the air causes the plants to produce an enzyme that makes for strong and sturdy stems instead of the leggy weak ones.
You can also gently run your hand over the seedlings to provide that movement but it should be done throughout the day, every day.
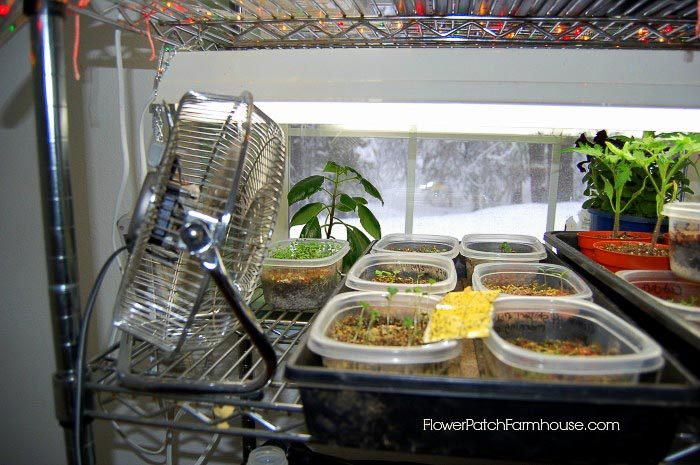
The moving air can cause the soil to dry out faster so keep a close eye on that. But the moving air also helps reduce mold and mildew issues.
Plant Seedlings
When the plants get bigger, when they get their true leaves, it is time to plant them in larger pots or containers. I let them get larger in their original growing pots before I transplanted them, I find it easier then.
I do start watering them with worm casting fertilizer when they get their true leaves so they get the nutrients they need but I don’t have to transplant them right away.
A product I have started using is Organic Rev and it works wonders. It isn’t a fertilizer but what it does provide makes my seedling so much more robust. If you want to give it a try, use this coupon code for 5% off, FlowerPatchRev
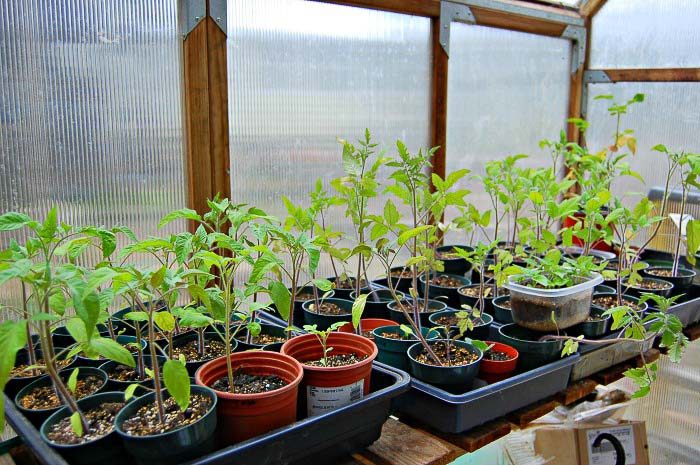
These tomato plants are way past the “when they get their true leaves” stage.
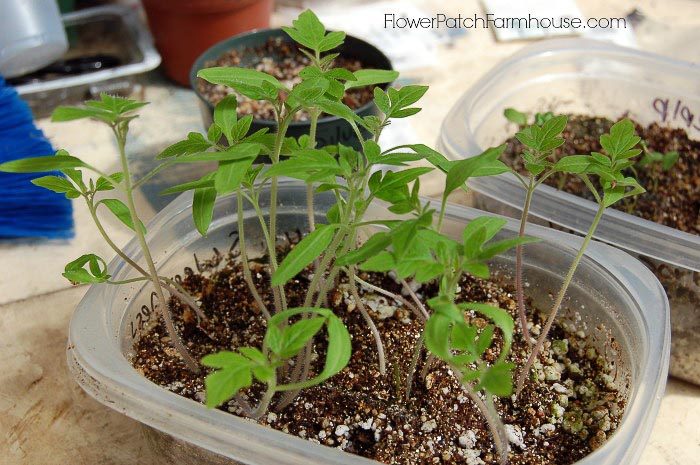
This is where having that very loose planting medium comes in handy. You can separate each individual tomato plant (or whatever you have grown) even though the roots are most likely intertwined by now. You just gently pull the roots apart, by now the stems and roots are very strong and can take it.
Handle them by the leaves and not the stems to prevent damage that may kill your seedling.
(some plants are not a good candidate for starting in pots ie: cucumbers, melons, squash, you can do it but 9 times out of ten you are better off just starting them in the ground when it is warm enough or make a hotbed) click here to go to the HOT BED POST
Before you know it your seedlings have jumped up and are ready for hardening off.
Start those Tomato Seeds
A complete post on how to successfully start robust tomatoes from seed. Tips, tricks and things I use that work to get them going strong!
That is the tough part for me, I get impatient but I will share how I do it in another post soon.
You will be popular with your friends. If you are like me and plant way more than you need you will end up with more than enough to share. Or sell your extras for some extra $$
Happy Planting and I wish you garden success!
Video below, just press to watch!
Happy Gardening!

Thank you, Terri. I do try and relate from my own personal experience and not from just what I hear or read, so you know it is real life and not just words.
Hi Pamela. I could not leave your website without giving you your much deserved kudos and a whole garden full of attaboys for the awesome content on your site. I’m not sure how I got to your site but I’m so very glad that ended up here. I typed in a question and google brought me to you for the answer! You are so knowledgeable about everything “garden” and you explain a process in a way that I could follow and even feel sure that I could emulate!! You have made a fan and follower out of me!! I can’t wait until tomatoe and vegetable planting season. And it’s not that far away!! Thanks Pamela!! You are the real deal!! And you are humble and kind as well!! I look forward to reading more of your ideas!
Terri In South Carolina
Good article & excellent way to articulate. Keep it up.
I love what you said about stacking tubs in order to create a mini greenhouse for your seeds. When it comes to planting and growing flowers, it’s best to work with a business that sells seed packets at a fair price. If I were to pursue gardening, I would make sure to work with a company that has the best flower seeds available.
Thanks So much!
My greenhouse is from a kit, here is the link to my actual one: http://www.easygrow.com/8-12mthoodgreenhouse.html
It has been one tough greenhouse, it has taken a lickin’ and keeps on tickin’. Even bear attacks.
Hi Pamela! One of the pics above shows a green house (I think) – is it made from scratch or a kit and do you have an article(s) about it on the site already?
Doug
LOL, the past couple years I have been using the salad containers too so we are even more kindred spirits than you realize. I did not think to use them as storage for beans, rice etc. So thanks for the idea.
I came across this article during my search to successfully sow delphinium seeds (and I did read that article) but decided to check out this one and much to my amazement, we are using EXACTLY the same system – Costco shelving (same unit), lighting (I’m using normal fluorescents, one cool, one warm), the tube light for bottom heat and a small fan for air circulation. This is truly weird. Anyway, the one thing I do a little differently is the containers. Instead of the Glad Food storage container, I recycle those plastic clamshell containers that salad greens come in. I punch holes in the bottom for drainage and they come with a ready-made attached lid. I have found these containers are amazingly useful for many things, including storing dry goods like beans, rice, grains in general,(no holes, or course) and they stack beautifully in the pantry.
I think we must be kindred spirits!
Awesome information and thank you
HOLA !!…ME ENCANTA LA FORMA, COMO EXPLICA TODO. ES MUY FACIL ENTENDERLA !!..LA FELICITO !!….LE DESEO QUE SIGA ADELANTE !!…TODO MUY INTERESANTE !!
I hear ya about getting the itch. Right now I am still doing some winter sowing. I can start the indoor seeding at the end of the month and I should be good. I love these racks, they are so useful for so many things. I was in Costco last week and they were on sale for $65, a bargain!
I’ve done a fair amount of seed starting. I have the same wire rack and use fluorescent lights. I have to say this is by far the best article I’ve read on seed starting. I have the itch so bad, but it is just to early here in Minnesota. Thanks for sharing!
I have seen on a garden show they use regular grit (garden centers so have it) or pea gravel. I am envious of your mild weather. We are about to head into another series of wild snowy weather and rain too. I have been enjoying the wee bit of sunshine we have gotten the past 4 days.
Your instructions on seed planting is great,it is straightforward and easily understood.What could I use instead of Chic grit? we do not have that in Ireland.I have been replanting my strawberry runners today it is very mild here.Thanks for your tips.
Great article. It really shows all the steps and little tricks needed. Also very approachable.
Welcome Emma. It is all doable, just keep trying even if you have a few failures. Green thumbs can be developed, you just have to love what you are doing. 🙂 I wish you great success and do share if you get to growin’!
What a wonderfully detailed explanation of your method. I have the brownest thumbs on the planet, but I love the idea of self-sufficiency and growing my own organic food for my family. Previously, my attempts have been fairly minimal (just plant it and it will grow? yeah, right!), so I’m looking forward in the next couple of months (I’m in Australia) to getting started properly.
BTW, found you on ByStaphanieLynn’s Sunday Showcase link party, and pinned this tutorial to my Gardening and Homesteading board.
Have a great day!
Emma
I want a greenhouse, too. I don’t think I could move from a place that had a greenhouse. And, I saw a program on some public television station where the man said that every clear layer of plastic that goes over a greenhouse moves it up one “zone” number. So to my way of thinking, if I had a small greenhouse, say 10 x 10, and covered it with four layers of plastic, I would practically be in Florida. It isn’t that I want to move to Florida, but I would like to go into my greenhouse for some humidity and warmth right around now. And pick a few tomatoes for dinner.
Ginene
Thank you, coming from you that is a great compliment. 🙂
We have not had much winter weather here but I know what you mean, none the less. I have survived long cold winters with my sanity because of being able to start my seeds and enjoy growing way before the snow melted. 🙂
Wow, I can never get them to grow in just windowsills. The only way I have been successful with starting seeds is with my racks. At one time for about 9 months we lived at a place that had the most fabulous greenhouse, insulated, facing south and boy did I fill that place with seedlings. (there were not big trees on that property) It was awesome. I wish I had a place for one of those here but we are among very tall trees so direct sun is limited, even on the south facing side in winter.
Such a treasure full of great info, thanks!
Pinned! I so have the spring itch! My daughter-in-law was here last evening and we were talking how soon it would be warm enough to start our seedlings. We are hoping for some warm weekends. We are over the winter blahs!
I would love to have a set-up like that because I start all the seeds for the five flower gardens that take care of for the village here. I manage to grow them in my tiny kitchen with two small south facing windows and it is a pain in the neck.
Pamela, if I was taking a walk and saw a house like yours with that amazingly charming garden, I would stop right there and try to take it all in. It is so charming, so welcoming and so pretty that I would have to ask myself if it is real. You did a killer job with that landscaping.
~Ginene